How To … Put a new project on codeplex in 10 steps
Step 1 : Have a project, compile to binary(exe, dll or other) and found a name for it ( for us is disk2vhd )
Step 2 : Goto www.codeplex.com , register(or sign in) , then click on “Create project” . There you will put the name of the project (disk2vhd for us) and a description for it. You will be redirected to the page of the project.
Step 3: For putting the source code , you must download the Codeplex Client from http://www.codeplex.com/CodePlexClient – click on download. Unzip the file , if necessary.
Step 4: (optional) put the folder cpc.exe in your path
Step 5 : Go to the project folder and run the following commands
cpc co <projectname>
cpc add <folder name> /e
cpc add <file name>
cpc commit /m “<your comment>”
Now verify that in the source code for your project on codeplex ( for me it is http://disk2vhd.codeplex.com/SourceControl/ListDownloadableCommits.aspx ) you have at least one change set.
Step 6: Ensure that the people that want to try your project can have the binary sources without problems .
Go to downloads , click new release (for me it was http://disk2vhd.codeplex.com/Release/ProjectReleases.aspx?Create=true ) and put the name and description.
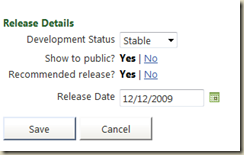
Also put the development status , show to public and recomended release to stable, yes and yes.
Click Save.
Step 7 : Choose a license .
Step 8 : Edit the description of you project
Step 9 : Publish your project (see the link in the first line of the web page)
Step 10 : You’re done! Congratulations!
